

Replacing a traditional deadbolt with an electronic one is one of the best upgrades you can make to your front door — and it is far easier than most homeowners expect. Whether you are tired of fumbling with keys, want to give family members their own entry code, or are setting up a short-term rental property with guest access, an electronic deadbolt puts you in control without calling a locksmith or rewiring anything.
This guide walks you through the complete process: what to check before you buy, the exact tools you need, a clear step-by-step installation process, and how to program your lock once it is in place. Most installs take about 15 minutes with nothing more than a screwdriver. By the end, you will have a fully working electronic deadbolt and the confidence to handle the whole job yourself.
What Is an Electronic Deadbolt?
An electronic deadbolt replaces a traditional keyed deadbolt with a lock that can be opened using a keypad code, fingerprint scan, physical key backup, or in some models, a mobile app or voice assistant. The bolt mechanism itself works exactly like a standard deadbolt — a solid steel bolt extends into the door frame to secure the door — but the cylinder is replaced with an electronic control unit powered by batteries. There are no wires to run, no electrical panel to touch, and no special skills required.
Electronic deadbolts fall into a few broad categories. A keypad deadbolt is the most common entry-level option, letting you unlock with a code and keep a physical key as backup. More advanced options include Wi-Fi smart locks and Smart Locks w/ G1 or Smart Locks w/ G2, which add remote access through a mobile app. The installation process is essentially the same across all of these types, so the steps below apply regardless of which style you choose.
Before You Start: What to Check on Your Door
Not every door is ready for an electronic deadbolt straight out of the box, and checking a few things before you order your lock will save you a return trip to the store. Getting this right takes about five minutes and prevents the most common installation headaches.
Door material: Electronic deadbolts like those in the Veise lineup are designed for wood doors. They are not compatible with fiberglass, metal, storm, or sliding doors. If your front door is solid wood or a wood-core composite, you are good to go.
Door thickness: Most residential exterior doors fall between 1-3/8 inches and 2 inches thick. Check your door's thickness before purchasing — Veise locks are designed for this standard range. If your door is unusually thick or thin, check the product specifications before ordering.
Existing hole size: Most electronic deadbolts are designed to fit in the standard 2-1/8 inch bore hole that nearly every exterior door already has. If you are replacing an existing deadbolt, the hole is almost certainly the right size. If you are installing on a new door with no existing bore, you will need a hole saw to cut it before beginning the steps below.
Backset measurement: The backset is the distance from the edge of the door to the center of the bore hole. The two standard sizes are 2-3/8 inches and 2-3/4 inches. Most electronic deadbolt kits include an adjustable latch that accommodates both, but confirm this before purchasing.
Strike plate alignment: If you are replacing an existing deadbolt, the strike plate on your door frame should already be aligned correctly. If the bolt is new or the door has been re-hung, you may need to chisel out a small mortise in the door frame so the strike plate sits flush.
Tools You Need
One of the biggest selling points of a modern electronic deadbolt is how little equipment the job actually requires. Here is what to have nearby before you start:
- A screwdriver (everything in the kit uses standard screws)
- A tape measure (for backset and door thickness checks)
- A pencil (for marking screw positions on the strike plate, if adjusting)
- Fresh AA/LR6 alkaline batteries — Veise locks do not ship with batteries, so pick up a new set before you start
- A chisel (only needed if the strike plate mortise needs adjustment)
That is genuinely the full list for a standard replacement install. No drill, no wiring, no special lock tools. If you are installing into a door that has no existing bore hole, add a hole saw kit to the list — but for the vast majority of homeowners replacing an old deadbolt, a screwdriver is the only tool that will leave the drawer.
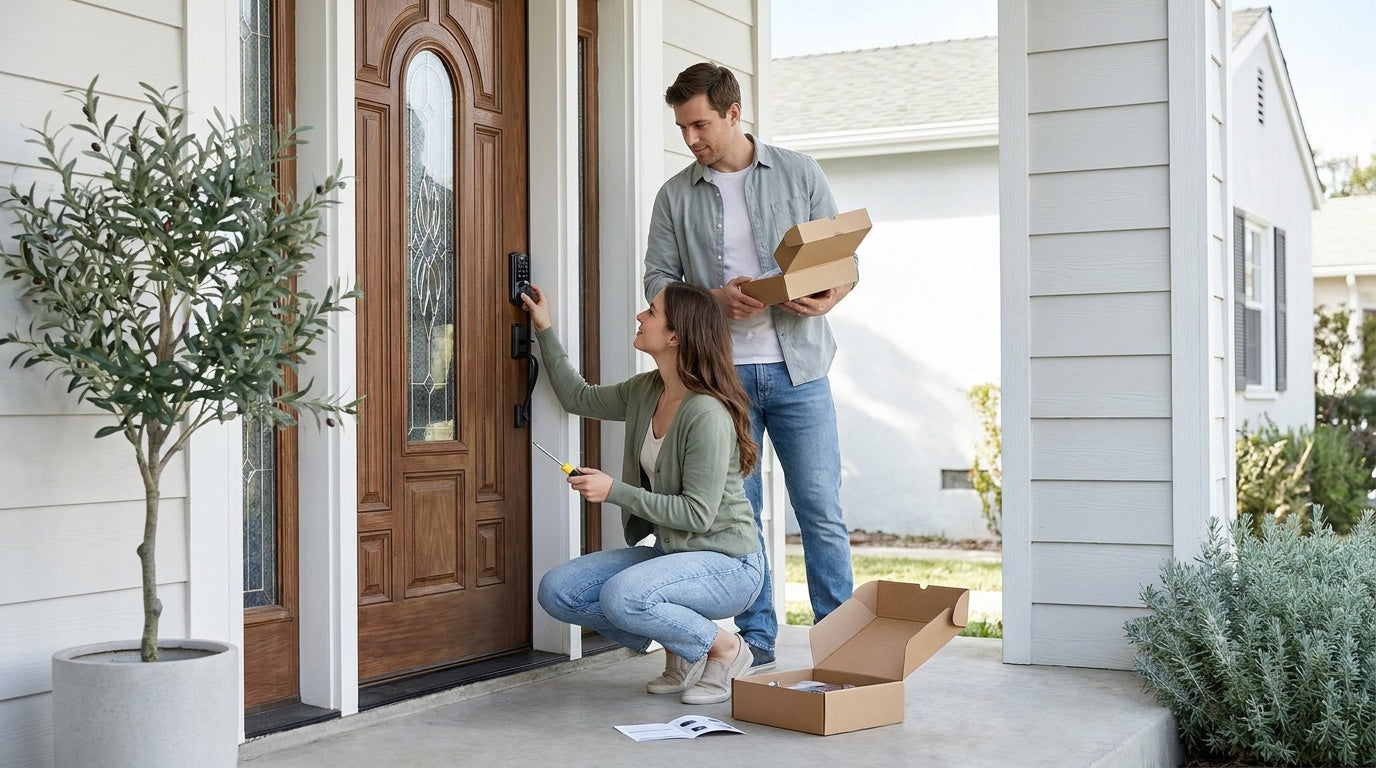
How to Install an Electronic Deadbolt: Step-by-Step
These steps assume you are replacing an existing deadbolt on a wood door. If your door already has the correct bore hole and backset, the entire process typically takes 15 minutes or less.
- Remove the old deadbolt. Open the door so you can work on both sides comfortably. Unscrew the interior thumb-turn assembly first, then remove the exterior cylinder. Once both sides are off, slide the latch bolt assembly out of the edge of the door by removing the two face screws. Set all old hardware aside.
- Install the new latch bolt. Slide the new latch bolt from your electronic deadbolt kit into the edge hole in the door. The beveled face of the latch should face the direction the door closes — toward the door frame. Secure it with the two screws provided. Make sure the bolt slides smoothly in and out before moving on.
- Prepare the exterior assembly. Thread the tailpiece (the metal connector rod) and any connecting cables from the exterior keypad unit through the bore hole in the door face. Most electronic deadbolt kits have a clearly labeled exterior piece — it is the side with the keypad or fingerprint sensor. Check your model's included instruction sheet to confirm which cables go where.
- Attach the interior assembly. Align the interior mounting plate over the bore hole on the inside of the door, connecting it to the exterior piece through the hole. Thread the connecting screws through the interior plate and tighten them into the exterior assembly. The two sides should sit flush and snug against the door face — not so tight that they crack the finish, but firm enough that there is no wobble.
- Connect the battery pack. Most electronic deadbolts power the interior assembly via a battery pack that slides into the interior housing. On Veise locks, use brand-new AA/LR6 alkaline batteries — do not mix old and new cells, and do not mix batteries from different brands. Follow the polarity markings inside the compartment. You should hear a startup chime or see an indicator light confirm power.
- Attach the interior cover. Slide the interior cover plate back on over the battery pack and mounting assembly — Veise battery covers slide on and off, so there are no cover screws to drive.
- Check and adjust the strike plate. Close the door slowly and extend the deadbolt. The bolt should slide cleanly into the strike plate opening on the door frame without rubbing or misaligning. If the bolt hits the frame or does not extend fully, loosen the strike plate screws, shift the plate slightly, and retighten. For a deeper mortise, use a chisel to widen the opening in the frame so the strike plate sits flush with the wood surface.
- Test the mechanical operation. Before you program any codes, test the bolt manually several times from both inside and outside. The bolt should extend and retract smoothly. If anything feels stiff or catches, check that the latch bolt assembly is fully seated and that the two side screws are evenly tightened.
Programming Your Lock After Installation
Once the hardware is in place and the bolt moves freely, you can lock and unlock the door immediately — every Veise lock ships with a preset default master code from the factory, so there is no "program a first access code" step before testing. Use the default master code to confirm the install works, then open the included manual to walk through changing the master code and adding personal PINs at your own pace. On select Veise lines (Smart Lock w/ G1 and the Touchscreen Wi-Fi Smart Lock VE027 series), the lock also walks you through setup with on-device voice prompts in English, Spanish, or French, so you do not need to memorize a sequence of button presses.
From there, the manual will guide you through setting your own master administrator code, which gives you full control over adding and deleting user codes later. Once the admin code is set, add your household entry codes. Most keypad deadbolts support multiple user codes, which is useful for families, housekeepers, or dog walkers who need their own access.
If your lock includes a fingerprint reader, enrollment typically captures your finger at different angles to build a reliable template — Veise locks prompt you to place your finger eight times during enrollment. Fingerprint recognition on Veise locks processes in under 0.3 seconds, so day-to-day entry feels nearly instant once setup is complete. All fingerprint data is stored locally on the device itself, with no cloud account or Internet connection required for the reader to work.
If you have chosen a connected lock — a Wi-Fi Smart Lock or a Smart Lock that works with a Gateway 1 or Gateway 2 — you will also pair the lock with the app during this stage. Remote access requires a smart lock (gateway-paired or Wi-Fi); keypad deadbolt locks and keypad latch locks cannot connect to a gateway for remote control. The app pairing process takes a few minutes and gives you the ability to lock or unlock from anywhere with an active Internet connection.
Tips for a Smooth Install
Most electronic deadbolt installations go off without a hitch, but here are a few things worth keeping in mind to make the job even smoother.
- Do not overtighten the side screws. The screws that pull the interior and exterior assemblies together should be snug, not cranked down hard. Overtightening can bow the door slightly or make the bolt stiff to operate.
- Use fresh batteries from the start. Partially used batteries can cause erratic behavior during setup. Start with a new set so the lock gets a clean first read of its power supply.
- Keep the door open while you work. It sounds obvious, but some people close the door to test the bolt and end up locked out mid-install. Test everything with the door open until you have confirmed the bolt retracts reliably with your programmed code.
- Take a photo before you remove the old lock. A quick photo of how the existing latch bolt sits in the door edge (which way the bevel faces, how the plate is oriented) gives you a useful reference when fitting the new one.
- Enable auto lock once everything is working. Most electronic deadbolts let you set an auto lock timer so the bolt extends automatically once the configured interval elapses (regardless of whether the door is closed — so make sure the door is closed before the interval expires). On Veise keypad deadbolt locks and keypad latch locks, the timer is configurable between 10 and 99 seconds; connected models (Smart Lock w/ Gateway 1/2 and Wi-Fi smart locks) extend the range to 10–180 seconds.
Choosing the Right Electronic Deadbolt for Your Home
The installation process is nearly identical across electronic deadbolt types, but choosing the right lock before you buy makes a real difference in day-to-day life. Here is a practical breakdown of the main options.
Keypad Deadbolt (code + key backup): The simplest and most affordable category, priced at the lower end of the Veise range. Veise keypad deadbolts support keypad code entry and include a physical key on every model. The KS02 series adds a fingerprint reader — every KS02 SKU includes fingerprint. These locks are a solid fit for homeowners who want straightforward, reliable access without app connectivity. Browse the full keypad deadbolt lock lineup to compare models.
Wi-Fi Smart Lock (remote access + keypad + fingerprint): If you want to check whether the door is locked, let someone in remotely, or get entry notifications on your phone, a Wi-Fi smart lock connects directly to your home network with no extra hardware. Veise offers two Wi-Fi series: the Touchscreen Wi-Fi Smart Lock (VE027 Series), which includes a USB-C emergency power port, key fob support, and on-device voice prompts in English/Spanish/French across the entire line, and the Push-Button Wi-Fi Smart Lock (VE012W Series) with a traditional press-button keypad (no USB-C, no key fob, no on-device voice prompts). Both support Wi-Fi connectivity, fingerprint, keypad code, app control, and work with Alexa and Google Assistant. This is a strong pick for parents who want to know when kids arrive home or for anyone managing a rental property. See all Wi-Fi smart locks here.
Smart Lock w/ Gateway (G1 or G2): These locks pair with a separate gateway device to enable remote control through a mobile app. Smart Lock w/ G1 is built on a single product series, the VE017, and every model in the line ships with fingerprint, USB-C emergency power port, and multilingual voice prompts in English, Spanish, and French — a useful feature for multilingual households. Smart Lock w/ G2 (VE0/RZ0 series) adds Apple Watch unlock and web portal control, and is available in both fingerprint and non-fingerprint configurations. Both Smart Lock w/ G1 and Smart Lock w/ G2 include keypad code, key fob, and physical key backup as standard. Explore Smart Locks w/ G1 and Smart Locks w/ G2 to find the right fit.
All Veise locks are ANSI/BHMA Grade 3 certified, which is the recognized standard for residential door hardware. Prices across the full lineup run from $30 to $180, with no subscription fees and no cloud dependency for core functions. Every lock is designed for a 15-minute DIY install — the same process described in this guide.
Frequently Asked Questions
Do I need an electrician to install an electronic deadbolt?
No. Electronic deadbolts run on batteries, not hardwired power. There is no electrical work involved. A screwdriver is all you need for a standard replacement install on a wood door.
How long does it take to install an electronic deadbolt?
Most homeowners complete the installation in about 15 minutes when replacing an existing deadbolt. If your door does not already have a bore hole, add time to drill the opening with a hole saw before beginning the steps above.
Will an electronic deadbolt fit my existing door holes?
In most cases, yes. Electronic deadbolts are designed to fit the standard 2-1/8 inch bore hole found on nearly all exterior doors. The adjustable latch bolt typically accommodates both standard backset sizes (2-3/8 inches and 2-3/4 inches). Check the product specifications for your chosen model to confirm compatibility.
What doors are compatible with Veise electronic deadbolts?
Veise locks are designed for wood doors with a thickness between 1-3/8 inches and 2 inches. They are not compatible with fiberglass, metal, storm, or sliding doors.
Can a renter install an electronic deadbolt?
Electronic deadbolts like those in the Veise lineup require full lock replacement, which means modifying the existing door hardware. This typically requires being the property owner or having explicit permission from the owner. Renters should confirm with their landlord before proceeding.
Do electronic deadbolts work if the batteries die?
Every Veise electronic deadbolt includes a physical key backup so you are never locked out due to a dead battery. Every Smart Lock w/ G1 (the entire VE017 series) and every Touchscreen Wi-Fi Smart Lock (the entire VE027 series) also includes a USB-C emergency power port, so you can connect a portable charger to the lock exterior and enter a code without replacing the batteries first.
Can I set the lock to auto lock after the door closes?
Yes. Veise electronic deadbolts support auto lock, which automatically extends the bolt once the configured interval elapses — auto lock fires on the timer regardless of door state, so make sure the door is closed before the interval expires. The timer is configurable between 10 and 99 seconds on Veise keypad deadbolt locks and keypad latch locks; Veise connected models (Smart Lock w/ Gateway 1/2 and Wi-Fi smart locks) extend the range to 10–180 seconds.
What is the difference between a keypad deadbolt and a smart lock?
A keypad deadbolt opens with a code (and key backup) but does not connect to your phone or home network. A smart lock adds remote access via a mobile app, either through built-in Wi-Fi or a paired gateway device. Both install the same way — the difference is in what you can do with the lock after installation.
Installing an electronic deadbolt is one of those projects that feels more intimidating than it actually is. Once you have the right lock in hand and understand the basic steps, the job moves quickly — usually in the time it takes to watch a short video. The payoff is real: no more hunting for keys, flexible access for everyone in your household, and the peace of mind that comes with knowing your front door is genuinely secure.
Whether you go with a straightforward keypad deadbolt or step up to a connected lock with app control, the installation process described in this guide applies to the whole range. Veise locks are built to make that process as simple as possible — 15 minutes, a screwdriver, and no subscription fees once you are done. Browse the full Veise lineup to find the right fit for your door, your household, and your budget.
Have questions about which Veise lock is right for your door, or need help during installation? Our US-based support team is ready to help by phone or email.


Leave a comment
This site is protected by hCaptcha and the hCaptcha Privacy Policy and Terms of Service apply.